 privacy
One of the best ways to get to know people better is to learn about their hobbies — whether they’re obsessed with old-timey technology, home-baked treats or, say, quality wine. These days, if you’re an amateur sommelier, you don’t need to taste hundreds of wines and commit everything to memory — all you need to do is download a smartphone app and create your virtual wine collection.
One of these apps is Vivino. It’s basically a social network for wine devotees: you can add wines to your collection, rate them, write reviews, follow friends’ accounts to see their latest discoveries and ratings in your feed and more. But posting your preferences for all the world to see isn’t necessarily the wisest idea. Maybe you don’t want to brag to your boss or that puritanical aunt about your forays into the world of wine. The problem is that if you don’t configure Vivino correctly, your data will be accessible to anyone on the Internet. Keep reading to find out how to make your profile in the app more private and secure.
Step 1. Close your profile
As is the case on most social networks, your Vivino profile can be visible either to anyone, to just your followers or to no one but you. When your profile is open, anyone can follow you without needing your consent. If access is limited, you’ll be notified of follow requests and you can decide whether to accept or reject them.
By default, your profile is open, which means that anyone will be able to check out your ratings, wish list and any photos you post. And to see all of that, other people don’t even need to download the app or register — they just need to find your account on the Vivino website. That’s even easier to do if you’ve shared reviews on social media. To avoid exposing extra data that anyone can see, we recommend that you limit the visibility of your profile:
- In the Vivino app on an Android device, open the My profile tab, tap the three dots in the upper right corner of the screen and then select Settings. On an iOS device, open the Profile tab and tap the gearwheel in the upper left corner of the screen.

The profile tab in the Vivino app for iOS (left) and Android (right)
- Scroll down to Settings.
- Tap My activity is visible to.
- You’ll see that by default, the option Anyone is selected. Instead select No one or Authorized.
If you select “No one,” you’ll completely hide your information and no one will be able to see it but you. If you select “Authorized,” you’ll continue to share your preferences with whoever has already followed you and people whose requests you accept later on.

Vivino settings, Privacy section
How do you get rid of shady “friends”? Unfortunately, there’s no way to edit the list of followers in the app. The only way to remove followers is to contact support.
Step 2. Use an alias
When you sign up for Vivino, you’ll be asked to enter a first and last name. Unless you’re a famous sommelier with a big fan base, your own blog and invitations to go on TV, there’s nothing that says you need to enter the name that’s on your passport. A made-up name will do the trick. Also, the app lets you add an alias — if you fill in this field in the settings, that’s what will be visible instead of your full name. If you’ve already created an account with your real information, it’s never too late to make a change:
- In the Vivino app on an Android device, open the My profile tab, tap the three dots in the upper right corner of the screen and then select Settings. On an iOS device, open the Profile tab and tap the gearwheel in the upper left corner of the screen.
- In the First name and Last name fields enter your made-up information or tap Alias and enter a nickname.
- At the same time, you can delete other information from your profile that might reveal your identity, such as information from the Bio field, links to social networks or other data.
Step 3. Disconnect social media accounts and disable auto-follow
You can connect your Vivino profile to your Facebook and Twitter pages. Maybe you already did this or perhaps you still intend to. You most certainly don’t want to share your wine achievements with all your connections, and as we’ve already mentioned, it’s really hard to unfriend someone on Vivino.
So the first thing you’ll want to do is disable the auto-follow function in Vivino for all your friends from social media:
- In the Vivino app on an Android device, open the My profile tab, tap the three dots in the upper right corner of the screen and then select Settings. On an iOS device, open the Profile tab and tap the gearwheel in the upper left corner of the screen.
- Scroll down to the Social networks section.
- Disable the Auto-follow friends function — the option button should turn gray.
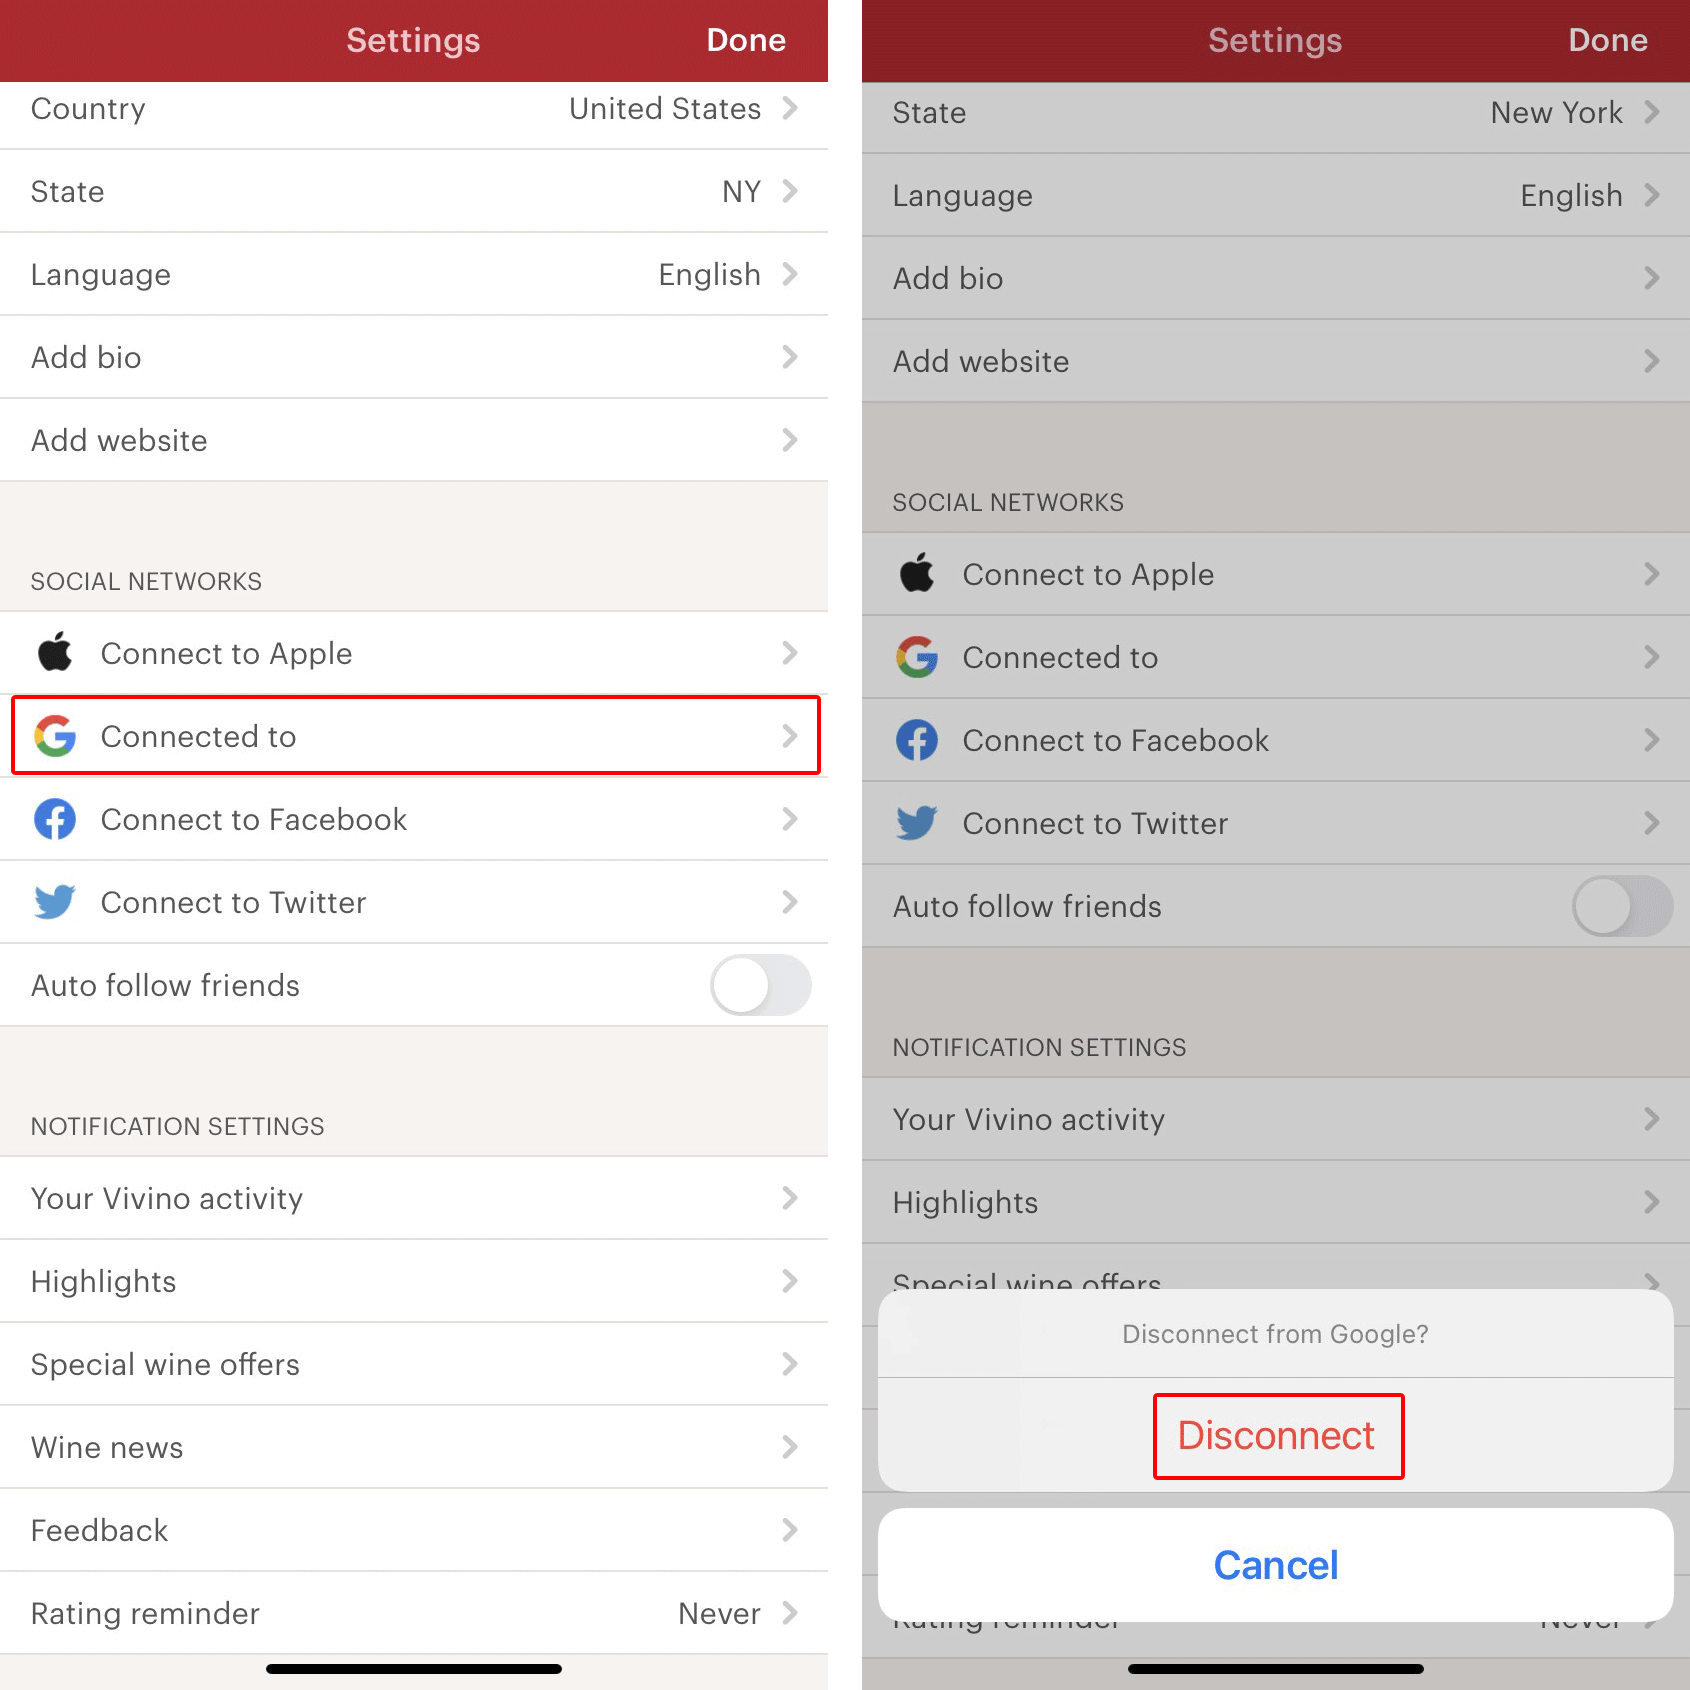
Vivino settings, Social networks section
Then consider whether you need to connect your wine escapades and social media accounts at all. Keep in mind that if you do connect them, Vivino will get access to quite a bit of your data on social media. If you previously connected a social network to Vivino but now you want to disconnect it, follow these instructions:
- In the Vivino app on an Android device, open the My profile tab, tap the three dots in the upper right corner of the screen and then select Settings. On an iOS device, open the Profile tab and tap the gearwheel in the upper left corner of the screen.
- Scroll down to the Social networks section.
- Tap the account you want to disconnect from and confirm your selection.
Step 4. Check your permissions
The app’s extra permissions are a potential security gap. We’ve elaborated on permissions and their implications in iOS and Android. In the case of Vivino, some permissions might be necessary — for example, access to your camera so you can take photos and identify wine labels. But you should think twice about the permission to use your location. The app will use it to suggest adding the closest bars and stores to reviews, but you can easily live without this.
To deny extra permissions on an Android device:
- Go into your smartphone’s Settings and select Apps.
- Locate Vivino on the list, tap it and select Permissions. Tap Location and select Don’t allow.
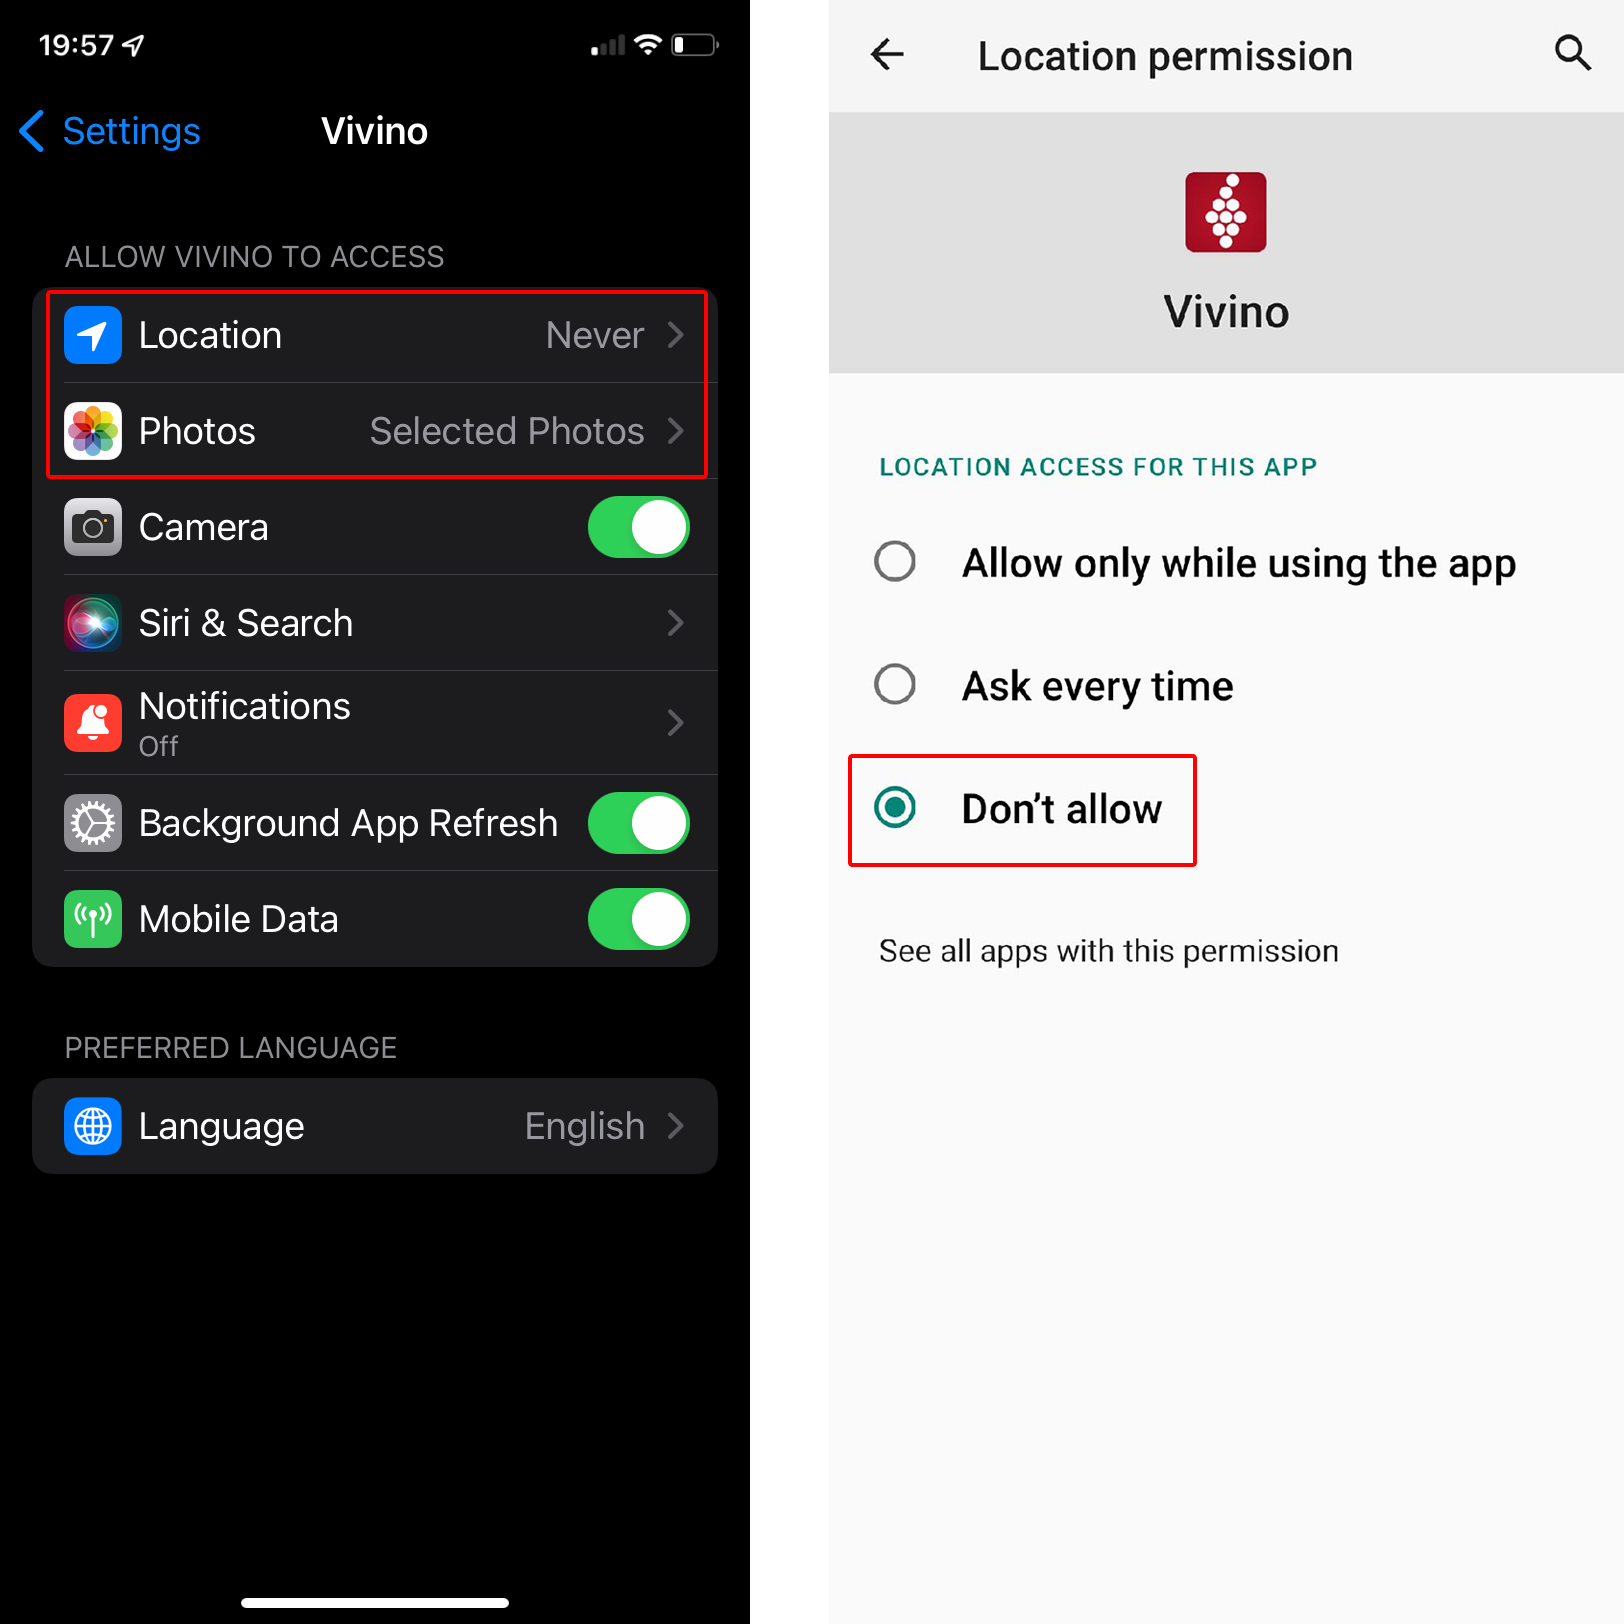
Vivino’s permissions settings in iOS (left) and Android (right)
To get rid of extra permissions on an iOS device:
- Go into your smartphone’s Settings, and scroll down to the list of apps and select Vivino.
- Tap Location and select Never.
- At the same time you can also limit the list of photos Vivino can access. To do that, in Photos specify Selected photos.
Step 5. Create a separate account for Vivino
When you create an account, you can choose to sign up through Facebook, Apple ID or Google. On the one hand, this is convenient because you won’t need to remember yet another username and password. On the other hand, this approach isn’t secure: if attackers hack the “parent” account, they’ll gain access to all the resources connected to it. That’s why we recommend that you create a separate account for Vivino with a unique strong password.
A word of warning: to register a new profile instead of the one you already have, you need to like privacy a little more than wine — you can only export your collection of wines from a previous account manually (even the option described here, where you would export the collection to a file, no longer works).
First you need to delete the old account because abandoning it is almost as harmful as using an unprotected one:
- In the Vivino app on an Android device, open the My profile tab, tap the three dots in the upper right corner of the screen and then select Settings. On an iOS device, open the Profile tab and tap the gearwheel in the upper left corner of the screen.
- Scroll down to the bottom and tap Delete account. After you confirm your selection, you will be taken to the sign-up screen.

Deleting a Vivino account and creating a new one
- Tap Need a new account? and enter an e-mail address and strong password.
- Since you’ll rarely need to enter this password (most likely only when you get a new phone), to make sure you don’t forget it, keep it in a safe place, such as a password manager.
Data protection
Now you know how to make your Vivino account as private as the app allows. To achieve even more privacy and security, make sure to use a reliable security solution that will warn you in real-time if your personal data is leaked.

 Tips
Tips